
In the world of home improvement, few projects offer the dramatic transformation of wall panelling with such accessible execution. DIY wall panelling kits have revolutionized the concept of home makeovers, turning what was once a complex carpentry project into an achievable weekend endeavor. These innovative systems provide everything needed to elevate your space from standard to stunning, proving that you don’t need professional skills or an unlimited budget to create beautiful, character-filled interiors.
The Makeover Magic of Wall Panelling
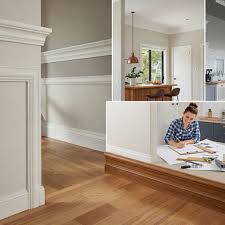
What makes panelling kits so effective for home makeovers is their ability to instantly add architectural interest where none existed. Flat, plain walls become dynamic surfaces with depth and character, transforming the entire feel of a room. Unlike paint alone, which only changes color, panelling introduces texture, shadow lines, and architectural detail that make spaces feel more intentional and designed.
The beauty of these kits lies in their versatility. Whether your style leans toward traditional elegance with raised panels and picture frame moulding, or you prefer contemporary flair with sleek slat walls and geometric patterns, there’s a kit designed to match your vision. This adaptability means you can create a makeover that truly reflects your personal style while adding value to your home.
Why Panelling Kits Make Perfect DIY Projects
All-Inclusive Systems
Modern panelling kits eliminate the guesswork that often discourages DIY projects. Each kit typically includes pre-cut panels, appropriate adhesive, and detailed instructions. This comprehensive approach means no multiple trips to the hardware store or confusion about what materials you need.
Forgiving Installation
Unlike tile or wallpaper that requires perfect alignment from the start, panelling kits are remarkably forgiving. Minor measurement errors can often be corrected, and the three-dimensional nature of the panels helps disguise small imperfections. This makes them ideal for DIYers of all skill levels.
Minimal Wall Preparation
While perfectly smooth walls are essential for painting or wallpapering, many panelling systems can be installed directly over existing wall surfaces, hiding minor flaws and saving preparation time. This immediate gratification makes panelling kits particularly appealing for quick makeovers.
Step-by-Step Makeover Process
Planning Your Transformation
Begin by choosing the right wall for your makeover. Feature walls behind beds, sofas, or in entryways often provide the most impact. Measure your space carefully and use painter’s tape to mock up your design on the wall before committing. This visual planning helps ensure the scale and pattern work well in your space.
Simple Installation Steps
-
Prepare the Surface: Clean walls thoroughly and make any necessary repairs
-
Mark Your Layout: Use a level to mark straight guidelines for panel placement
-
Apply Adhesive: Follow kit instructions for proper adhesive application
-
Install Panels: Press panels firmly against the wall, checking alignment as you go
-
Secure if Needed: Use finishing nails for additional security in high-traffic areas
-
Finishing Touches: Caulk edges and fill any gaps for a seamless look
The Magic of Paint
The final transformation happens with paint. Whether you choose to match your wall color for subtle texture or use a contrasting color for dramatic impact, this step unifies the installation and creates that professional, built-in look.
Maximizing Your Makeover Impact
Strategic Placement
You don’t need to panel every wall to achieve a dramatic makeover. Often, a single feature wall provides the perfect amount of impact. Consider these high-visibility areas:
-
Behind your bed in the master bedroom
-
As a backdrop for your dining table
-
In the entryway to create a strong first impression
-
Behind your sofa in the living room
Lighting Considerations
Think about how light interacts with your new panelling. Directional lighting can enhance textures and create beautiful shadow patterns, while ambient lighting ensures the details remain visible day and night.
Complementary Decor
After your panelling makeover, consider updating accessories and furniture arrangement to highlight your new feature wall. The panelling often becomes the room’s focal point, so arrange other elements to complement rather than compete with it.
Budget-Friendly Transformation
Compared to other major home improvements, panelling kits offer exceptional value. The cost is typically significantly less than hiring a professional for custom millwork, yet the visual impact can be just as dramatic. By doing the installation yourself, you’re investing primarily in materials rather than labor, making this one of the most cost-effective ways to elevate your home’s interior.
The true beauty of DIY wall panelling kits lies in their ability to deliver professional-looking results through an accessible process. They represent that perfect intersection where satisfying DIY project meets genuine design transformation. In just a weekend, you can take a room from ordinary to extraordinary, creating spaces that feel thoughtfully designed and rich with character. For anyone looking to refresh their home without the expense and disruption of major renovation, wall panelling kits offer the perfect makeover solution—proving that dramatic transformation doesn’t require dramatic effort or expense.